
Ever wanted a professional website for your business but felt put off by the cost or complexity? In this tutorial, I’ll show you exactly how to build a complete, modern website — with a booking form, WhatsApp integration, Google Maps, animated stats, and more — using Google Gemini AI. No coding knowledge required. No monthly fees. Done in minutes.
This is exactly what I demonstrated in my YouTube tutorial.
Let’s walk through the full process step by step.
What You Will Build
Before we dive in, here’s what your finished website will include:
- A modern, professional UI with your business branding and logo
- A click-to-call phone button
- A services section
- A team / about section
- Google Reviews display
- A blog or insights section
- A FAQ accordion
- Google Maps integration showing your exact location
- An appointment booking form
- WhatsApp chat button
- Social media links
- Animated statistics (years of experience, number of clients, etc.)
All of this — built entirely with AI, hosted for free, with zero lines of code written by you.
What You Need Before Starting
- A Google account (to access Gemini)
- A Netlify account — free at netlify.com
- Your business details: name, phone number, WhatsApp number, address, services list
- Optional: a few photos of your business (under 1MB each for best performance)
- Your Google Maps embed code (we will cover how to get this below)
Step 1: Open Google Gemini in Pro Mode
Go to gemini.google.com and start a new chat. Switch to Gemini Pro. If you do not have Gemini Pro, the standard version still works.
Step 2: Write Your Prompt
This is the most important step. The better your prompt, the better your website. Here is a prompt template you can copy and customise:
Create a complete, modern professional website for a Pakistani restaurant called [Your Business Name].

Requirements:
- HTML, CSS, and JavaScript only (no backend, no frameworks, single file)
- Dark, modern theme
- Sticky navigation bar with logo and phone number
- Hero section with a background image and booking CTA button
- Services / menu highlights section
- Team section with photos and names
- Animated stats section (years open, dishes served, happy customers)
- Google Reviews / testimonials section
- Blog or news section with 3 sample posts
- FAQ accordion section
- Appointment / reservation booking form
- Google Maps embed (I will provide the embed code separately)
- WhatsApp floating chat button linked to +92XXXXXXXXXX
- Social media icons in the footer
- Fully mobile responsive
- Use Unsplash images for now (real photos will replace them later)
Replace the placeholders with your actual business name, WhatsApp number, and any specific services you want to highlight.
Paste this prompt into Gemini and press Enter. Within 30–60 seconds, Gemini will generate the complete HTML, CSS, and JavaScript code and show you a live preview in Canvas.
Step 3: Refine and Customise
The first output is your starting point. Now you can give Gemini follow-up instructions to refine it — exactly like a conversation. Here are some useful refinement prompts:
To change the colour theme:
“Change the theme to a dark background with gold accent colours”
To add a real image from Unsplash:
- Go to unsplash.com
- Find an image you like
- Right-click on it → Copy Image Address
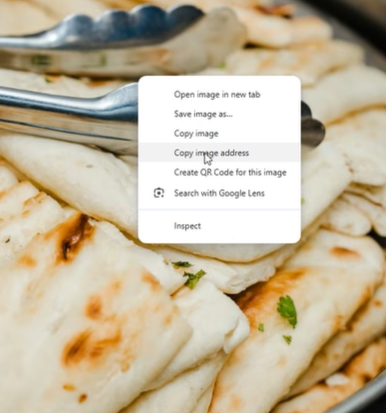
- Tell Gemini: “Replace the hero background image with this URL: [paste the URL].”
To integrate Google Maps:
- Go to maps.google.com
- Search for your business address
- Click Share → Embed a map → Copy the HTML iframe code
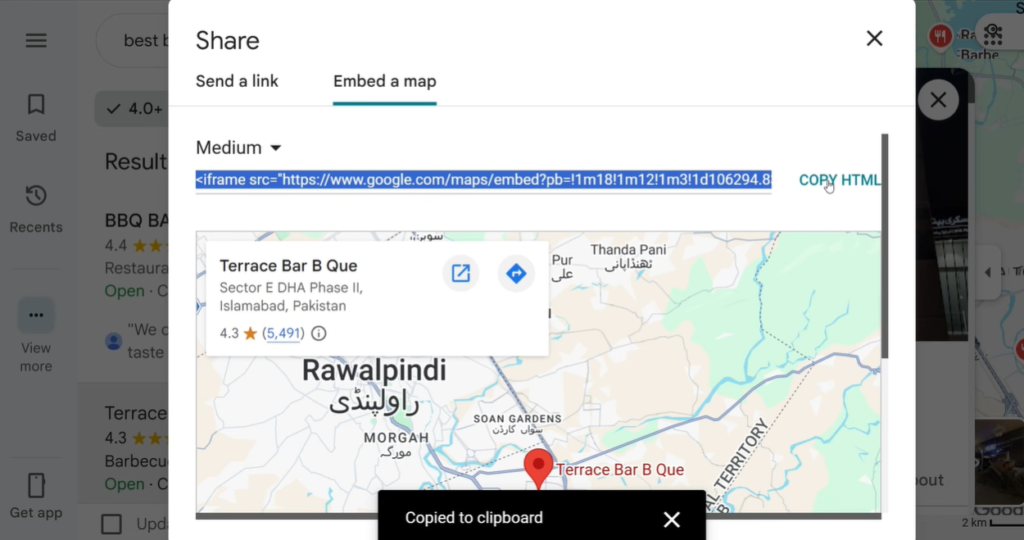
- Tell Gemini: “Add this Google Maps embed to the location section: [paste the iframe code].”
To update the WhatsApp number:
“Change the WhatsApp number to +923001234567”
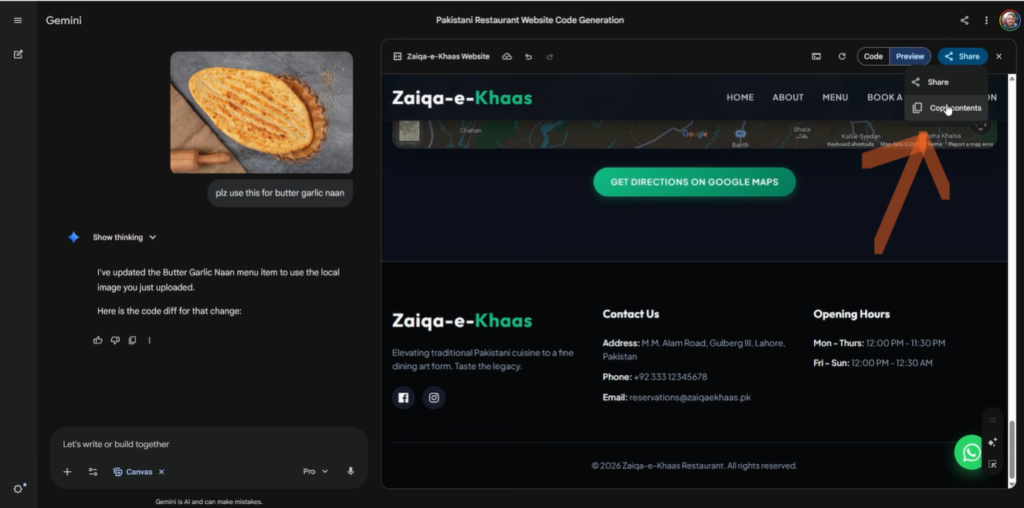
To use your own photos: Drag and drop your image file directly into the Gemini chat window and say:
“Use this image as the hero background photo”
Important note: Local images you upload to Gemini will not appear in the Canvas preview because they are not hosted online yet. This is normal. They will display correctly once your website is properly hosted on Netlify.
Step 4: Copy the Code
Once you are happy with the design, copy all the generated code. In Gemini Canvas, look for the share button (usually top right of the code panel). Click on “Copy Contents”.
Step 5: Save as index.html — This Step is Critical
Open Notepad (Windows) or TextEdit (Mac). Paste all the code. Now save the file — and here is the most important part:
You must name it index.html — not website.html, not mysite.html, not index.txt.
Here’s why: when someone visits your website, the web server looks for a file called index.html by default. If your file has any other name, visitors will see an error instead of your website. This is a universal web standard that applies to every hosting platform.
Step 6: Prepare Your Folder
Create a new folder on your desktop. Name it something like my-restaurant-website or your actual business name.
Place your index.html file inside this folder. If you have any local photos you want to use, place them in the same folder as well (or in a subfolder called images/).
Image tip: Keep all image files under 1MB for best loading speed. You can compress images for free at umairalam.com/reduce-image-size before adding them to your folder.
Step 7: Deploy to Netlify for Free
- Go to netlify.com and sign up for a free account (you can use your Google account)
- On your dashboard, scroll down to find the drag-and-drop deployment area — it says “Want to deploy a new project? Drag and drop your folder here.”
- Drag your entire website folder into that area
- Wait about 10–15 seconds while Netlify uploads and deploys your site
- Netlify will give you a free URL like
your-restaurant.netlify.app
Your website is now live and accessible to anyone in the world — completely free.
To set a custom URL name: In Netlify, go to Site Settings → Change site name and set something memorable like lahori-darbar.netlify.app.
To use your own domain (like yourrestaurant.com): Purchase a domain from Hostinger and connect it to Netlify through the Domain Settings panel. Netlify provides free SSL (the padlock in the browser bar) automatically.
FAQs:
Will the website work on mobile phones?
Yes — as long as your prompt asked for a mobile responsive design (which our template above includes), the website will work perfectly on all screen sizes.
What if I want to change something after deploying?
Make the change in your HTML file, then drag the folder to Netlify again. It will update within seconds.
Can I add a contact form that actually sends emails?
Yes. The booking form in the generated code is a front-end form only by default. To make it send real emails, sign up for a free account at web3forms.com, get your access key, and add it to the form. I will cover this in a separate tutorial.
What if Gemini makes a mistake in the code?
Simply describe the problem to Gemini: “The navigation bar is overlapping the hero section — please fix it.” Gemini will correct the code. Most issues are fixed within one or two follow-up prompts.
Can I use this for any type of business?
Absolutely. The same approach works for dental clinics, law firms, property dealers, salons, gyms, schools — any business that needs a professional web presence. Just change the business type and requirements in your initial prompt.
What’s Next
You now have a live, professional website built entirely with AI in under an hour. Here are some things to do next:
- Replace Unsplash placeholder images with your actual business photos
- Test the WhatsApp button on mobile to make sure it opens your correct number
- Verify the Google Maps embed shows your exact location
- Share the URL with your clients and on your social media
- Connect your own domain for a more professional appearance
If you found this tutorial helpful, watch the full video walkthrough on my YouTube channel @umairalamchaudhry, where I demonstrate every step live on screen, including the Gemini Canvas preview, image integration, and Netlify deployment.
Free Tools Mentioned in This Tutorial
- Image Compressor — compress your photos before uploading
Have a question about this tutorial? Leave a comment below.